Sunday, April 29, 2012

Lentil Soup with Curried Brown Butter

It was a dreary day in NC yesterday. Cloudy, chilly and windy. Even though we are several days into spring, I was in the mood for soup! Since I still have a large amount of lentils in the pantry (from a shopping spree at the local Indian market), I decided to make one of our favorite soups - Green Lentil Soup with Curried Brown Butter. This is another Heidi Swanson recipe that I have tweaked a bit to our liking.

Lentil Soup with Curried Brown Butter

Lentils

Lentils are one of my favorite ingredients to cook with. I like to make them on Sunday to have for lunches throughout the week. They are very easy to make, cheap to buy and healthy to eat! Lentils are actually seeds from an annual plant part of the legume family and come in many different types. Unlike other dried beans, these do not need to soak overnight before cooking and will absorb the flavor of whichever liquid cooked in. I usually cook lentils in broth to enhance the flavor.

Lentil Soup with Curried Brown Butter

In this case, it was vegetable broth and I had split peas (which can be substituted for green lentils if you can't find them). I had some spring onions left over that I added to the onion and garlic.

If you are new to curry, I encourage you to experiment with it. Curry has become a staple in my kitchen, as Ryan and I really love bold flavors. Start with the basic curry powder in your grocery store and then go from there. I have found that the grocery store bought curry powder is actually very mild compared to authentic curries. So if you are new to the flavor, this is a great place to start. This soup really is fantastic! Please don't let the word "curry" or "lentil" hold you back. Try it out and let me know what you think of the combination of flavors!


Lentil Soup with Curried Brown Butter

Yields: 6 servings
Prep Time: 10 minutes
Cook Time: 45-60 minutes

2 tablespoons ghee or butter
1 small red onion, chopped
2 spring onions, green parts removed and thinly sliced
2 garlic cloves, finely chopped
2 teaspoons curry powder
1/2 teaspoon red pepper flakes
1 1/2 cups dried green lentils (can also use dried
5 1/2 cups vegetable broth, water or mixture of both
3 tablespoons unsalted butter
2 tablespoons curry powder
Plain yogurt
Chives

In a large soup pot, melt the ghee (or butter) and add in the onions and garlic. Saute until the onions have softened a bit, about 5 minutes. Add in the red pepper flakes and curry powder, stir well and saute for another 1 minute until very fragrant.

Lentil Soup with Curried Brown Butter

Add in the lentils (or split peas) and stir to mix in with onions and butter. Stir in the broth/water and cover the pot. Cook on medium heat for at least 30 minutes, or until the liquid has been absorbed by the lentils. This took almost 50 minutes for me.

Lentil Soup with Curried Brown Butter

When you are close to the end of cooking time for the lentils, melt the unsalted butter in a small saute pan over medium heat. Cook until a nutty fragrance comes out. Stir in the curry powder and cook for a minute or two longer while stirring constantly. Be careful not to burn anything!!

Once the lentils are cooked through, remove from heat and leave the lid off the pot. Serve with a small spoonful drizzle of the curry browned butter, yogurt and chives. You can also top with bacon or pancetta as I did in this picture.

Lentil Soup with Curried Brown Butter

Saturday, April 28, 2012

The Limoncello Experiment (parte due)

If you read the post about The Limoncello Experiment, then you know that I have embarked on a journey to find a decent homemade limoncello recipe. However, I am not a fan of the super sweet kinds that are sold in our local liquor store in NC. I imagine limoncello is not high in demand amongst Southerners. 

As I mentioned in my first post, we were disappointed about the turnout of the first batch. It was lacking in a strong lemon flavor and it wasn't sweet enough. I added more sugar syrup to the first batch and revisited last night, finding it to be better, but still lacking in the strong lemon flavor that takes your senses straight to Italy and beyond! 

The Limoncello Experiment | www.kettlercuisine.com

Needless to say, I started over with a new batch, but did some things differently:

Thursday, April 26, 2012

Better Butter

Ryan and I LOVE butter. One could say I have always had a liking for the creamy stuff because when I was young, my mom would catch me eating it straight from the fridge! Even though I am a healthy cook, I actually cook with butter often. However, when I use it, I use REAL butter. Please don't ever substitute margarine! It might be lower in saturated fat and cholesterol, but it not naturally derived! If you are curious about it, here is a great post.

When people think of butter, usually toast or bread comes to mind. Unfortunately, butter isn't always the healthiest condiment, so I would like to share some substitutes that Ryan and I often turn to for toast or bread toppings.

Better Butter

Monday, April 23, 2012

Monday Night Shrimp Tacos

In my continuous effort to stay warm during this rare, cold, spring weather, I decided to bring Mexican flare to dinner with tacos!


Taco Night | www.kettlercuisine.com

Tacos are a great way to get dinner on the table in under 30 minutes AND clean out your fridge. You can top them with virtually anything.

Sometimes the best dinners are ones just thrown together. I make a list of what I have in the fridge, freezer and pantry and build the meal around a protein (meat, seafood, beans, tempeh, etc). In this case, it was shrimp.

I had corn tortillas, sour cream, random vegetables that needed to be eaten and some leftover chipotle chilies in adobo sauce. So I started to assemble. I combined the sour cream, lime juice and chilies to make a spicy cream sauce and seasoned the shrimp with my homemade chili rub. With everything assembled, voila dinner in 20 minutes!


Taco Night | www.kettlercuisine.com

Here are some suggested ingredients to mix and match for a quick taco night:


Sunday, April 22, 2012

Moroccan Salad with Mango Yogurt Dressing

I love North Carolina. It is a beautiful state with both mountains and sea, but the unpredictable weather drives me nuts sometimes! We had a glimpse of spring; mid-70 degree afternoons and slightly cool nights. Landscapes started to bloom and turn green and the Farmer's Market showed the initial signs of spring produce.

Then out of nowhere, we get a cold, wet weekend to throw everything off. Determined to not ruin my spring-drive, I decided to make a fresh salad for dinner. I used a sandwich recipe that I had come across previously as inspiration for my Moroccan-style salad.

Moroccan Salad with Mango Yogurt Dressing

Since Ryan and I have a love for Indian cuisine, we always have mango chutney in our fridge. So if you don't have this on hand, you could easily replace apricot preserves for the dressing or replace the dressing entirely with your favorite.

Another thing worth mentioning is the caramelized onions. A few nights ago, I had some girls over for drinks and appetizers. I made caramelized onions as a tapenade to go along with a farm goat cheese and crackers. The night ended with leftover onions, which I decided to save for another use. Glad I did, because they were fantastic on this salad!

To make caramelized onions, slice 2 yellow onions (sweet onions) and saute them in a skillet with 2 T olive oil and pinch of salt for about 35-40 minutes, stirring occasionally. This seems like a long time, but you want to cook them over medium-low heat, so it takes a while for the natural sugars to come out and caramelize the outside. Here is what they should look like when finished:

Moroccan Salad with Mango Yogurt Dressing

Moroccan Salad with Mango Yogurt Dressing

Yields: 2 servings
Prep Time: 20 minutes
Cook Time: 15 minutes

For the Chicken:
2 skinless, boneless chicken breasts
2 teaspoons curry powder
1 teaspoon ground ginger 
1/4 teaspoon cinnamon
1 teaspoon paprika
1/4 teaspoon cayenne
1/2 teaspoon ground cumin
1/8 teaspoon ground nutmeg
salt and pepper to taste
3 tablespoons olive oil

For the Dressing:
2 tablespoons mango chutney
2 tablespoons buttermilk
4 tablespoons whole plain yogurt

For the Salad:
Romaine lettuce
Mixed spring greens
Red bell pepper, chopped
Caramelized onions
Pine nuts
Mango yogurt dressing (recipe above)

Combine the all the spices together with the olive oil and mix well. Rub generously on both sides of the chicken and set aside for up to an hour to marinate.
To make the dressing, combine the mango chutney, buttermilk and yogurt and mix well. Set aside.

Preheat oven to 400F and heat an oven-safe saute pan over medium-high heat. Saute the chicken breasts in the pan for 3 minutes per side, being careful to not burn the chicken. After sauteing, place the pan in the oven to finish cooking, about 10 minutes.


Moroccan Salad with Mango Yogurt Dressing

While the chicken is cooking, assemble the salad with romaine, mixed greens, red bell pepper, pine nuts and caramelized onions. Slice the finished chicken and place on top of the salad and drizzle with the dressing. Serve immediately.


The feeling of spring stays with you through the random cold nights in NC!

Thursday, April 19, 2012

Sweet Potato Pasta with Crispy Kale

There are three things that Ryan won't touch - sweet potatoes, coconuts and beets. Since all of these are in my fav list, I only cook with them when he is out of town. I have tried everything to get him to like these ingredients, but he won't budge! 

Sweet Potato Pasta with Crispy Kale

Well, lucky for me, Ryan was going out of town and my bestie Meg was coming over for a girls night.

Sweet Potato Pasta with Crispy Kale
Crispy kale.
I decided to make dinner with one of the "Hubby-hated" ingredients. I came across this creamy sweet potato pasta dish on How Sweet It Is a few weeks ago that I wanted to try. Since Meg and I had a run the next morning and I was on a kale-kick - this recipe was perfect!

Sweet Potato Pasta with Crispy Kale
Look at that creamy goodness!
With cosmos poured and creamy sweet potato pasta with crispy kale in hand - let girls night commence! 

Sweet Potato Pasta with Crispy Kale

Tuesday, April 17, 2012

Spring Produce and Very Veggie Frittata

Spring is here and so is fresh produce!! One of my favorite weekend rituals involves heading to the local farmer's market to see what wonderful produce is available for me to cook with for the week. 

Spring Produce and Very Veggie Frittata | www.kettlercuisine.com

I love going on Sunday mornings because the crowd is a bit smaller, but the vendors have just as much fresh produce. 

I brought my camera along with me to take some images of the season's first bunch of spring onions, asparagus, tomatoes, kale and surprisingly, strawberries!

Spring Produce and Very Veggie Frittata | www.kettlercuisine.com

As soon as I got there, I knew exactly what I wanted to cook - one of my Mom's fantastic recipes, her Very Veggie Frittata. I walked through the market, grabbed all my ingredients, including 2 dozen eggs from the cheese guy, and rushed home. I would surprise Ryan with a nice Sunday brunch!

Spring Produce and Very Veggie Frittata | www.kettlercuisine.com

I have mentioned my Mom in a previous post. She is my inspiration when it comes to cooking and this is just one of the many recipes that she has in her repertoire. Don't worry, I plan on sharing many more!!!

With a little smoked salmon, fresh farm goat cheese and bacon on the side (for my Hubby), this turned out to be a yummy Sunday brunch! 

Spring Produce and Very Veggie Frittata | www.kettlercuisine.com 

Very Veggie Frittata

Yields: 4-6 servings
Prep Time: 15 minutes
Cook Time: 25 minutes

1 tablespoon coconut oil
tablespoon ghee or butter
1 cup red onion, chopped
4 ounces shitake mushrooms, chopped
1/2 red bell pepper, chopped
4 cups squash, zucchini, asparagus, chopped
tablespoons fresh parsley, chopped
tablespoons fresh basil, chopped
8 organic eggs
1/4 cup organic milk or half n half
2 teaspoons Dijon mustard
teaspoons sea salt
teaspoon fresh ground pepper
1/4 cup cheese (goat, feta or favorite)
 

Heat oil and ghee in a large sauce pan that can go in the oven; add onion, mushrooms, red pepper and sauté about 3 minutes to soften.  Add the chopped veggies, parsley, basil and cook an additional 5 minutes.

Spring Produce and Very Veggie Frittata | www.kettlercuisine.com

Preheat broiler to high.

While the above is cooking, whisk together the eggs, milk, Dijon, salt and pepper.  Spread the veggies in an even layer and pour the egg mixture over them.  Sprinkle the cheese on top and gently swirl in with a spatula. Cook about 15 minutes until it is pretty set.  Preheat the broiler and put under for a few minutes to finish cooking and brown the top.  Slice and serve with a good drizzle of truffle oil.

Spring Produce and Very Veggie Frittata | www.kettlercuisine.com

**This recipe is so versatile - using any combination of veggies, spices or add ham, bacon, pancetta - just be creative.

Sunday, April 15, 2012

Grandma's Strawberry Pie

Strawberry season came early this year, which means only one thing, Grandma's Strawberry Pie!

One of my favorite things from childhood was going to visit my grandparents at the beach. Not only were they the most wonderful people, but my grandmother was an amazing baker! When strawberry season came around, she was known for two things; freezer jam and strawberry pie. 

Grandma's Strawberry Pie | www.kettlercuisine.com

Her pie is definitely not traditional. Most people think of a baked strawberry rhubarb pie, but this is a cold fresh strawberry pie.

When Grandma passed away, we were sure to save her recipe book. But we quickly learned that she never actually followed a recipe, but did it all from her head. The recipes she passed on were all very short, vague and left a lot of room for imagination.

Grandma's Strawberry Pie | www.kettlercuisine.com

For some reason, I just couldn't get it right. I called on the help of my Aunt Liz, who provided advice and my mother who remembers Grandma making this several times when I was growing up. After several failed attempts over the years, I was determined this early strawberry season to finally nail it. 

Grandma's Strawberry Pie | www.kettlercuisine.com

Well, Grandma, I am proud to say that I think I finally produced a successful one today. I have added in necessary notes and changed the recipe a bit to make this a foolproof pie. Each time I make this, I will still think of the wonderful woman, Betty Hegele, my grandmother.

Grandma's Strawberry Pie | www.kettlercuisine.com


Strawberry Pie

Yields: 9 inch pie
Prep Time:15 minutes
Cook Time:12 minutes for the pie shell

*1 Baked pie shell 
5-6 cups of fresh strawberries (in season)
3/4 cup sugar
2 T corn starch
3 oz. of cream cheese
1 T fresh basil, chopped (optional)

*For the pie shell: you can either get a rolled up pie dough in the refrigerator section (Pilsbury makes a decent one), or make your own pie crust. 

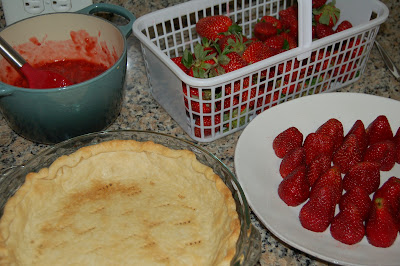
Wash the strawberries well and let dry completely. Cover the cooled pie crust with the cream cheese and place whole strawberries (cut-side down) to cover the bottom of the shell. Take the remaining strawberries and lightly puree in a food processor (or mash well in a bowl if you don't have a processor). The pureed or mashed strawberries should produce about 1.5-2 cups.

Place pureed strawberries into a small saucepan and heat over medium heat. Once it comes to a boil, slowly add in the sugar and cornstarch and stir continuously so the bottom won't burn or turn into a gel. You just want the mixture to thicken. Once thickened, remove from heat and let cool, stirring a few times to release the heat.

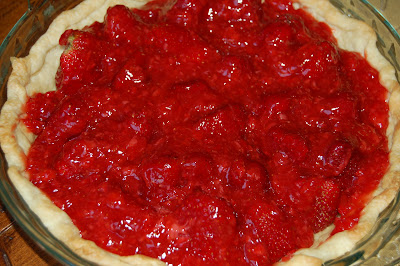
Pour the mixture over the whole strawberries in the pie shell and refrigerate for at least 2 hours before serving. 

I like to serve this with freshly made whipped cream, flavored with 2 T powdered sugar and 1 T Grand Marnier Liqueur. 

Saturday, April 14, 2012

Roasted Vegetable Couscous with Tomatoes and Mozzarella

A friend of mine recently posted one of my recipes on her website, The Nana Network. Jorj Morgan, a wonderful chef and entertainer, is also a loving Nana and welcomes guest bloggers on her site. The post is one of my favorite recipes, so I wanted to share with my readers also. You can read the story here and the full recipe is below. 

I came up with this recipe by "accident" when trying to come up with a veggie-filled dish that Ryan would like as well. This instantly made it onto our "R list" (which means repeat list).

Roasted Vegetable Couscous with Tomatoes and Mozzarella | www.kettlercuisine.com

Roasted Vegetable Couscous with Marinated Tomatoes

Yields: 2-4 servings
Prep Time: 20 minutes
Cook Time: 30 minutes


2 Portabella mushroom caps, gills removed, cut into ¼-inch pieces, about 2 cups
1 red bell pepper, cut into ¼-inch pieces, about 1 cup
1 medium zucchini, cut into ¼-inch pieces, about 1 cup
1 medium yellow squash, cut into ¼-inch pieces, about 1 cup
1/2 red onion, cut into ¼-inch pieces, about ½ cup
4 tablespoons olive oil
Coarse salt and freshly ground black pepper
1/2 teaspoon dried basil
1 pint cherry tomatoes, quartered, about 1 cup
1 tablespoon balsamic vinegar
1 tablespoon olive oil
1/2 teaspoon crushed red pepper (optional)
1 cup plain whole wheat couscous
1 cup home made vegetable broth, or prepared low sodium vegetable broth
4 ounces fresh mozzarella, cubed, about ½ cup
1 bunch fresh arugula leaves, about 3 cups
1 tablespoon chopped, fresh basil

Preheat the oven to 400º

Mix the cherry tomatoes, balsamic vinegar and 1 tablespoon olive oil into a small bowl. Add 1/2 teaspoon salt, pepper and crushed red pepper. Stir until all the tomatoes are covered and set aside, stirring every 5 minutes.

Place the vegetables onto a baking sheet lined with parchment paper and coated with cooking oil spray. Drizzle 2 tablespoon olive oil over the vegetables. Sprinkle with 1/2 teaspoon salt, pepper and dried basil. Toss to coat. Roast for 30 minutes.

In a medium pot mix vegetable broth, the remaining 1 tablespoon of olive oil and 1/2 teaspoon salt. Bring this to a boil, add in the couscous and cover the pot and remove from heat. Let this sit for about 5 minutes and fluff with a fork to break up any clumps.

To assemble the dish, place a handful of arugula on a plate. Top with couscous and roasted vegetables. Top with mozzarella chunks and the cherry tomato mixture. Drizzle with additional oil.

Roasted Vegetable Couscous with Tomatoes and Mozzarella | www.kettlercuisine.com

Friday, April 13, 2012

Chef Salad for Lunch

On the rare occasion that I work from home, I always like to set aside 30 minutes to make a nice lunch. And with all the different ingredients in my fridge, a chef salad sounded perfect!
 

The wonderful thing about a chef salad is any ingredients can be added. I usually just see what I have left in the refrigerator and throw something together.

On this salad I added romaine lettuce, cucumber, lightly steamed green beans, carrots, pine nuts, roasted red peppers, bacon, avocado and manchego cheese. Top with your favorite dressing and voila! You have yourself a healthy lunch that tastes MUCH better than a cheeseburger from McDonalds.

Wednesday, April 11, 2012

Kale Salad

Ryan always laughs about the first time I cooked for him. We had just started dating and I wanted everything to come out perfectly to impress him. Unfortunately, I decided to saute some kale, and severely burned it.  After about 8 years, and a promise to not saute it ever again, he was finally willing to give kale another try. I told him I would create a kale salad inspired by a lunch spot I frequent.

Kale Salad | www.kettlercuisine.com

This little cafe is convenient and perfect for a quick, semi-healthy lunch. Unfortunately they drown their kale salad in dressing and I always feel like I have to swim through a pool of vinegar to get some air! So, in light of new beginnings with Ryan and kale, I thought I would take a stab at coming up with my own version using Ryan as the taste tester.

Kale Salad | www.kettlercuisine.com
By blanching the kale, it brings out the vibrant green color.

I made the Crispy Salmon from How Sweet It Is, to go along with the kale. No carbs for me tonight after 4 days of eating pasta!

Kale Salad | www.kettlercuisine.com


Kale Salad

Yields: 6 servings
Prep Time: 10 minutes
Cook Time: 1 minute

2 bunch of kale (about 1 pound), center ribs and stems removed, leaves thinly sliced crosswise
1/2 cup dried unsweetened cranberries (or cherries)
1/2 cup shredded carrot (about one carrot)
1/2 cup manchego cheese, cut into small cubes (can also use Parmesan or Romano)
2 T white balsamic vinegar
1 tsp fresh lemon juice
2 tsp honey (or agave)
1/4 cup olive oil
salt and pepper to taste

First, blanch the kale. Boil a large pot of salted water. While the pot is coming to a boil fill a large bowl with ice water for the ice bath. Place the kale slices in the boiling water and let cook for 30 seconds. Quickly take out of the boiling water and place in the ice bath to stop the cooking. Then drain the kale and let dry.

In a separate bowl, combine the lemon juice, balsamic, honey, salt and pepper. While quickly whisking, add in the olive oil to emulsify the dressing. Set aside.

Place the kale in a large bowl and add cranberries, pine nuts, shredded carrot and manchego cheese. Stir until combined and drizzle over half the dressing and gently mix again. Add more dressing if desired. Serve!

The flavor was even better the next day for leftovers!

Tuesday, April 10, 2012

The Limoncello Experiment (parte uno)

Ever since I studied abroad in Italy 8 years ago, I have been in love with Limoncello. Unfortunately it is not that easy to find in the US and usually not as good. When Ryan and I were planning our wedding, we decided to toast with limoncello instead of Champagne, since neither of us really like the bubbly stuff. My mom was able to find some decent limoncello that we could use at the wedding, but it still wasn’t the same.

The Limoncello Experiment (parte uno) | www.kettlercuisine.com
Make sure there is no white pith on the peels when you eventually place in the jar with the liquor. There is still some remaining on the image above that I removed.
So I decided about a month ago to make my own. I did a bit of research on recipes and reviews. I decided to use vodka for my limoncello since I like the taste of it (several people use grain alcohol). I also decided to use Meyer lemons instead of regular lemons because they were in season. I tweaked a few recipes and came up with the below (updated after first taste test).

The Limoncello Experiment (parte uno) | www.kettlercuisine.com

And, five weeks later it was time to taste! I brought it to Easter dinner with the family to get some good feedback. Unfortunately, it wasn’t sweet enough and it needed a stronger lemon flavor (hey, every once and awhile you have flops)! So I made another batch of the sugar syrup and added it to the limoncello and will re-taste in a 8-10 days, and of course report back.

The Limoncello Experiment (parte uno) | www.kettlercuisine.com

Hopefully I can save it!

Limoncello

Prep time: 30 minutes + 1 month + 2 weeks

I large container 8 Meyer lemons
1 750 ml bottle Smirnoff vodka (80 proof or higher)
1 cup sugar
2 cups water

First, thoroughly wash and scrub any residue and waxes from your citrus.

Peel the lemons. You’ll want to peel long strips along the length of the lemon, pulling off little to no white pith. If you do peel any pith, scrape it off gently with a paring knife.

Add the lemon peel to a large glass vessel (use a large mason jar so the lemon rinds can be easily removed. Then a nice glass bottle for the final product). Pour in the vodka, seal tightly, and let sit for at least one week, preferably longer! (Ideally, give it one to two months.)

After you’ve let your limoncello cure for your preferred length of time, prepare the simple syrup.

To make the simple syrup, simmer the water and the sugar over a low heat just long enough to dissolve the sugar. Do not bring to a boil. Remove from heat, and cool to room temperature.

When cool, add the simple syrup to the limoncello, tasting as you go. Allow it to rest for another 10-14 days.

Finally, strain the lemon rinds and sediment using cheesecloth or a coffee filter. Place the container or bottle in the freezer and served chilled.

Monday, April 9, 2012

Sweet and Spicy BLT Sandwich

After consuming way too much meat over the weekend (sausage, meatballs, chicken and bacon), I was in serious need for a vegetarian meal when I got home from work today. I remembered a recipe that I had been wanting to try from 101 cookbooks, and realized I had all the ingredients already (wonderful that I didn’t have to stop at the crowded store). So I hurried home and whipped up the marinade for the tempeh so it could work its magic until dinner time.

Sweet and Spicy BLT Sandwich | www.kettlercuisine.com

Since Ryan isn't the biggest fan of soy products, he asked if he could have bacon on his instead of the tempeh. I told him that was perfectly fine, but wasn't sure about how it would pair with the other flavors. He was up for the taste-tester challenge though! 

Sweet and Spicy BLT Sandwich | www.kettlercuisine.com

I know he always loves the combination of sweet and spicy so I added a few ingredients to the avocado, put mayonnaise on his sandwich and made a few tweaks. With either the marinated tempeh or bacon, all the flavors come together so well for a fantastic sandwich!

Sweet and Spicy BLT Sandwich | www.kettlercuisine.com

Sweet and Spicy BLT Sandwich

Yields: 4 sandwiches

If using Tempeh:
8 oz. package of tempeh, sliced
3 T olive oil
2 T balsamic vinegar
2 T maple syrup
3 T adobo sauce from a can of chipotle peppers

If using Bacon:
12 slices of maple cured bacon (use your favorite kind)

Remaining ingredients:
2 pints of cherry or grape tomatoes, halved lengthwise
2 T good maple syrup 
2 T olive oil
1 tsp. kosher salt 
1 avocado, mashed with a fork 
1 jalapeno, de-seeded and finely chopped
fresh lemon juice
Whole romaine lettuce leaves 
8 slices of good quality whole grain bread, toasted 
Lite mayonnaise (optional) 
If doing a vegetarian sandwich, combine the ingredients and pour over the slices of tempeh in a pan. Ideally all the slices of tempeh should be covered. Cover and refrigerate for a few hours or overnight.

Preheat oven to 350 degrees.
 
Toss the tomatoes, maple syrup, olive oil and salt in a small bowl and pour onto a lined cookie sheet (I used parchment paper). Make sure all tomatoes are facing upward and spread evenly across the cookie sheet. Don’t be afraid to get your hands dirty here!
 
Roast the tomatoes for about 35-40 minutes in the oven, gently tossing twice during the cooking time. When tossing, make sure to keep the tomatoes cut-side facing upward - your goal here is to just make sure the tomatoes aren’t sticking. Once the tomatoes are done cooking, turn the oven off and leave the tomatoes in the oven while preparing the other ingredients (for up to an hour). 

While the tomatoes are cooking, cook the bacon or tempeh (or both). For the bacon, cook to desired crispiness. For the tempeh, heat a saute pan over medium-high heat and cook the tempeh slices a few minutes on each side (they should be lightly browned).

In a small bowl, mash the avocado and add the chopped jalapeno and a few drops of lemon juice (to your taste liking) and mix well. 

Toast the bread and wash the lettuce leaves. Assemble sandwiches by spreading the avocado mixture on one piece of bread, mayonnaise on the other (if using). Evenly divide the tomatoes among 4 sandwiches and pile on the bacon (or tempeh) and lettuce.
 

Sunday, April 8, 2012

The little Easter Bunny

Happy Easter!! This is a great holiday for family and friends to get together. Ryan and I got to spoil our sweet Goddaughter Avery a bit with a little early Easter Basket this weekend!!


And we were awoken by this adorable picture from her parents! I guess she likes the bunny ears :)


Today, we are heading to our Mom's house to make homemade pasta and sauce. So watch out for a post some time soon with pictures and step by step instructions on this. Once you have fresh pasta, it is hard to go back to the box stuff!

Friday, April 6, 2012

Blood Orange Martini - Happy Friday!

It's Friday, I got out of work early and it is a beautiful sunny afternoon in NC. I took it upon myself to have a drink on the back patio to take in the last rays of Vitamin D of the day. I had two blood oranges left in my fruit basket (and probably last of the season), and decided to mix it with vodka. Inspired by my Mom's famous Cosmopolitan recipe, I thought I would share my Blood Orange Martini. 

Blood Orange Martini | www.kettlercuisine.com

Beware...this is a bit strong, so one is probably enough and your husband might just get hooked on fruity drinks!!

Happy Friday!


Blood Orange Martini

Serves: 2
Prep time: 5 minutes

2 Blood oranges, juiced (about 4-5 Tablespoons)
3 shots of your favorite vodka
2 tsp of fresh lime juice
1 shot of Grand Marnier or other orange liqueur
Blood orange wedges for garnish

Chill martini glasses in freezer for 15 minutes. Add all ingredients to a martini shaker filled with ice and shake well. I like to take one of the squeezed slices of orange and rub the rim of the martini glass for extra flavor, then place in glass for garnish. Pour drink mixture into glass and serve immediately. If you are a slow drinker, add a few of the ice cubes from the shaker to your drink so it stays cold.

And voila, you will feel like you are in a big city bar in the comfort of your own living room!!


Thursday, April 5, 2012

My Mother

I know this is a cooking blog, but I have to dedicate my post today to my sweet mother, Rose! She is the most amazing person in the entire world and I look up to her in so many ways. I can honestly say she is my inspiration when I am in the kitchen cooking and creating. Ever since I can remember, she was creative in the kitchen and would always find a way for me to help her cook, even if it meant making a mess (which I usually did).

Kettler Cuisine | www.kettlercuisine.com

The reason I am dedicating today's post to her is because it is her birthday today!! Happy Birthday Mom!! I have always had a special relationship with my mother, but the last two years has been significantly special to me - She Saved Me. 

Kettler Cuisine | www.kettlercuisine.com

I have introduced myself as a very healthy eater - focusing on whole foods and organic, local ingredients when possible. However, I have not introduced why I came to be such a health-conscience eater. About three years ago, I started feeling very sick. I was tired and nauseous all the time and wasn't able to digest any food. I had constant fevers and rapid weight loss. After several tests and scans (and way too much Prednisone), I was diagnosed with Crohn's Disease, which is an autoimmune disorder affecting your digestive system. After being prescribed steroids and chemotherapy-like drugs for the rest of my life, my mom went in search for another treatment. 

Kettler Cuisine | www.kettlercuisine.com

She spoke and met with holistic doctors and specialists, tried acupuncturists, read books and sent me recipes and diets. I did a month of no gluten, dairy, alcohol or sugar. I started keeping a food journal and identifying the foods that bothered me, while Mom read and spoke to everyone she knew to try to figure out something. After about a year, I started getting back on the right track and exercising again. Mom introduced me to Body Ecology, which explains how certain food combinations can reduce inflammation in the gut and entire body. All was looking up and I was back on the right track. Then, I got engaged!! Yes, this was so very exciting because I couldn't wait to marry Ryan, the love of my life, but it also meant I would spend the next year of my life as a stressed out bride planning the wedding - this would flare my Crohn's right back up.

Kettler Cuisine | www.kettlercuisine.com


Mom came to the rescue again by taking on a lot of the stress and planning. We decided to get married in the mountains where my parents live, so Superwoman Rose was her amazing-self and helping me every step of the way. It was the most fun 16 months my Mom and I have ever had. She not only was so supportive and helpful with the wedding planning, but constantly kept me focused on my health as well. Needless to say, on October 1st, I married Ryan and felt the healthiest I have ever been.

Kettler Cuisine | www.kettlercuisine.com

So mom, thank you so much for everything and have a fabulous birthday! You are an amazing woman, mother and friend! I love you :)