Thursday, August 23, 2012

Kettler Tomato Pie

Tomato Season!!!

I don't really have a cute story to tell beyond the fact that we love tomato season in the Kettler house! We purchased about 5 lbs at the market with no plan on how to use them. We just walked around the market tasting all the tomatoes and couldn't stop buying them. 

Kettler Tomato Pie | www.kettlercuisine.com

One of my favorite recipes is a tomato pie - not the stereotypical Southern, mayo-loaded pie, but a fresh, basil-kissed one!

This is possibly the most simple "pie" to assemble, but the tricky part is getting the right tomatoes. If you use really ripe tomatoes, they will create so much juice during the cooking process that you end up with more of a soup than a pie. But if you get tomatoes that are not ripe enough, they are not sweet.


Kettler Tomato Pie | www.kettlercuisine.com

Monday, August 20, 2012

Truffle Honey Mustard

Mustard every day

If there is one condiment that I can't live without, it is mustard. I will eat any kind, yellow, dijon, brown, honey, whole grain....love it! So when Ryan and I went out for dinner one night and ordered the soft pretzels with truffle honey mustard, my mouth about exploded with flavor-awesomeness!

Truffle Honey Mustard | www.kettlercuisine.com

I immediately took a picture with my phone and made a note to try to re-make this at home. I couldn't help myself, the next night I started playing around with the flavors to see if I could come up with my own version. After several tries (and many Hubby taste tests) the recipe came together. 


Initially I was thinking that I could use this as a salad dressing, but with a thicker texture, I decided that it would be better as a dipping sauce or condiment for a sandwich or wrap. 


I had it on a veggie burger wrap for lunch the next day and it was delicious! I added spinach, radishes and a bit of goat cheese as well. Yum!!!


Truffles

I should probably include a few comments about truffles and truffle oils since this is not an item normally found in kitchens, mostly because it is expensive. However, I've had the same little bottle of white truffle oil for about 3 years now. The flavor is very pungent, so very little is needed. 

Not to be confused with the chocolate kind, truffles are in the mushroom family and are cultivated in Europe, mostly Italy, France and Spain. There are two main types, white and black. The white has a more pungent flavor and the black is more earthy. I prefer the white truffle flavor. 


The most economical way to get the flavor of truffle at home is through an oil. Most truffle oils don't actually contain truffles in them though. They are artificially flavored to taste like it - little known fact! 


Regardless, I like the flavor of truffle oil and would highly recommend that you try it if you have never tasted it. I drizzle the oil on top of fritata's, like the
Very Veggie Fritata or over salads in place of dressing. Also, it is a great finishing oil, but don't cook with it!

Truffle Honey Mustard

Prep Time: 10 minutes
4 tablespoon honey
tablespoon  whole grain mustard
tablespoon  truffle oil
tablespoon  olive oil
pinch of red pepper flakes
salt and pepper to taste

In a small bowl, mix all the ingredients together, except the salt and pepper, until well combined. Add salt and pepper to taste. Store in an air tight container and keeps in the refrigerator for several weeks.

Serving ideas:
  • dip for chips or pretzels
  • salad dressing
  • condiment for sandwiches or breakfast wraps
  • with scrambled eggs

Wednesday, August 15, 2012

Light Cajun Alfredo Sauce

My husband and I have been together for over 8 years and I can honestly say, I have never made Alfredo sauce for him, which is his favorite. I know, bad wife! I've never been a fan of cream sauces or making Alfredo sauce at home (usually I just get store bought and heat separate sauces for our pasta). 

Alfredo on the Light Side

In an effort to try to come up with a lighter version of Alfredo and one that I would enjoy as well, I thought about adding some spice.

Light Cajun Alfredo Sauce

Sunday, August 12, 2012

Grill, Meat, Football

I got home Thursday night to a happy husband....a VERY happy husband. He had the coals on the grill heating up, our Meat House steak tips and veggies laid out and counting down the minutes until NFL preseason started! 


It certainly was a nice treat to have him prep and cook dinner, all I had to do was steam broccoli and slice a tomato. He stepped outside with a huge grin on his face to start grilling (oh, the relationship between a man and his grill is almost as enigmatic as the one with football). I offered to get him a drink and he giddily asked for the new Stout that was chilling in the fridge. I opened and poured some for the both of us. 

We opened a bottle of one of our good wines (from a wedding gift case we got from a family friend) and enjoyed the hell out of that steak! It is amazing that among our chaotic lives, we still find simple pleasures in food and drink (and football). We watched our beloved NC State Alum, Philip Rivers take on the Packers, and enjoyed the beginning of football season. (Why the network wasn't playing Peyton's debut, I shall never know!!)


So, in the spirit of my blog, I have to include a little something about our meal. When Ryan grills, he takes half a red onion and greases the grill with olive oil. This adds extra flavor and prevents the use of an aerosol cooking spray. I took the other half of the onion, sliced it and sauteed it in some of the delicious Stout beer that we were drinking that night. The beer gave the onions a yummy caramel coating, which paired well with fresh tomato slices and basil from our garden.

The onions caramelize in about ten minutes - a flavorful and easy addition to any cookout or dinner salad!

Tuesday, August 7, 2012

Chocolate Peanut Butter Pretzel Bites

We all love the men in our lives, but let's get real for a second ladies....we LOVE our girl time! This past weekend myself and 5 other girls headed for the coast for a fun-filled weekend of good food, drinks and noodling!

Chocolate Peanut Butter Pretzel Bites | www.kettlercuisine.com

Noodling?? This was a new concept for me as well. It involves a noodle flotation device, a can of beer and sunglasses.....oh, and of course, a large body of water. (The beer is optional, but highly suggested)!


You can probably also imagine that with 6 girls in the house, we were bound to eat and drink well. That we did my friends! Everyone contributed to the stockpile of food and drinks, but this time there was a standout - Chocolate Peanut Butter Pretzel Bites!

I seriously had to hide the two in the picture above so I could get a picture before we ate them all! Katie and Nicole outdid themselves on these - we couldn't stop eating them! And the common quote of the weekend was, "I know I shouldn't have a second one, but I'm on vacation." It really was hard to just stop after one! 

I know that I preach healthy recipes and eating, and that my blog focuses on whole foods and organic ingredients, but healthy, smealthy!! There are always exceptions. You can't eat healthy 100% of the time, so when you cheat, you might as well cheat WELL. 

The last thing I will say about these delicious little bites is that they reminded me of the Take 5 candy bar. So if you like those - make these....


Chocolate Peanut Butter Pretzel Bites (a.k.a. Take 5 Bites)

Recipe from Two Tiny Kitchens
Yields: 45-60 treats

1 cup creamy peanut butter
2 tablespoons softened butter
1/2 cup powdered sugar (maybe more)
3/4 cup brown sugar (maybe more)
Small pretzels
1 bag semi-sweet chocolate chips

Combine peanut butter and softened butter in a large bowl with a fork or whisk, or in a stand mixer. Add the sugars and mix to combine. If the filling rolls easily into a ball without sticking, they are ready. If not, add a little more of each sugar until a consistency is reached that is easy to roll.

Use a teaspoon measure to scoop the filling. Roll each portion into a small ball, then sandwich them between two whole pretzels. When all the balls are rolled and successfully sandwiched, stick the whole tray in the freezer for about half an hour.

Pour the chocolate chips into a microwave safe bowl and heat at 30-second intervals, stirring occasionally until completely melted.  Remove the pretzel sandwiches from the freezer and quickly dip each half-way into the melted chocolate.  Return to the tray and repeat with remaining sandwiches.  When all are dipped, return the tray to the freezer to set up completely.  Store the sandwiches in the refrigerator until serving time.

Chocolate Peanut Butter Pretzel Bites | www.kettlercuisine.com

Sunday, August 5, 2012

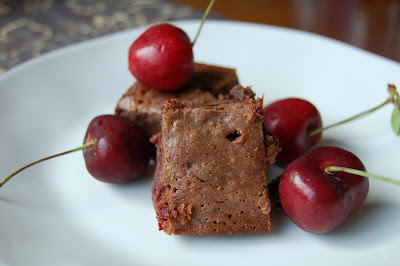
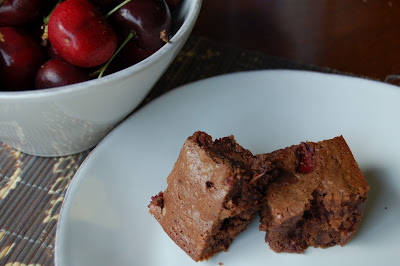
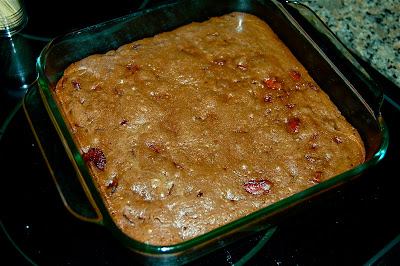
Chocolate Cherry Brownies with Whole Wheat


Chocolate Cherry Brownies with Whole Wheat | www.kettlercuisine.com

We all know my love for Pinterest! The Hubby laughs at me when I come home claiming I am going to try a new recipe I found on Pinterest. What did we do before pinning??? Magazines, Food Network, maybe a quick search on MyRecipes.com. But Pinterest is transforming the culinary world, and the amount of people interested in it. Yes, the site has other focus areas, but Food and Drink tend to take the top used category according to  Repinly.com.

Screenshot of my Pinterest profile - so fun!!
If you have not heard of it, go to Pinterest.com and welcome yourself to 2012!! You can follow my boards, which are all dedicated to food and drinks, with a random board here and there for cute kitties and books.

Anyways, back to the issue at hand - a new fan-freaking-tastic recipe that I found on Pinterest. Cherries are everywhere, and there is no such thing as buying a small bag of cherries in the market. Every time I commit to purchasing these pricey little fruits, I have to commit to also making something with them in addition to eating alone. I have done a cherry tart, cherry crumble, cherry sauce for pork tenderloin, bourbon soaked cherries (those were good) and also just sharing with my neighbors. This time though I had a perfect recipe in mind - Chocolate Cherry Brownies!

Chocolate Cherry Brownies with Whole Wheat | www.kettlercuisine.com

I came across this recipe on Pinterest from a fellow food blogger, Texanerin Baking. It wasn't the fact that there was less sugar in these brownies, or that they were made with coconut oil and whole wheat flour. It was the fact that this recipe used whole fresh cherries and not the canned kind!

I made a few small tweaks to the recipe to accommodate my baking style and changed the baking time completely. These are very rich and fudgy, so have a glass of milk ready!


Chocolate Cherry Brownies

Adapted from Texanerin Baking 
Yields: 16 brownies
Prep Time: 10 minutes
Cook Time: 30-40 minutes


3 tablespoons refined coconut oil (can substitute normal unsalted butter)
1/3 cup plus 1 tablespoon semisweet chocolate chips
3/4 cup coconut sugar or turbinado sugar (raw sugar)
1 egg
1 egg yolk
1 1/2 teaspoon vanilla
1/4 cup low fat milk
1/4 cup canola oil
3/4 cup whole wheat flour
1/4 teaspoon salt
1/4 cup cocoa powder
Heaping 1 cup pitted fresh cherries
1 cup dark chocolate chips


Preheat the oven to 350F, and line an 8x8 inch baking dish with parchment paper.

In a large microwave safe bowl, melt semisweet chocolate chips and coconut oil in 20 second increments. Stir after each increment and watch carefully so not to burn the chocolate.

In a large standing mixer (or large bowl), mix the sugar, eggs, vanilla, milk and oil together until just combined. In a separate medium sized bowl, mix the flour, salt and cocoa powder and add to the wet ingredients. Mix until combined, then stop!

Fold in the cherries and dark chocolate chips into the batter and pour into the prepared baking dish. Bake at 350F for 30-35 minutes until a toothpick sort of comes out clean (there will be gooey, melty chocolate chips in the matter too remember)!

Note - check the brownies after about 20 minutes, the original recipe calls for only 15 minutes in the oven, but mine took 32 minutes. Ryan commented that they were still a bit gooey, but I kept them in the fridge and they were delicious that way. So if you like more set cakey brownies, bake them for longer.

Chocolate Cherry Brownies with Whole Wheat | www.kettlercuisine.com

Friday, August 3, 2012

Curry Broccoli and Couscous

Yay!! I am so happy to be back in the kitchen! July was a whirlwind of traveling to every corner of North Carolina and beyond. We had A LOT of great times with friends and family, by all the traveling messed with my weekly routine of training for the marathon, healthy eating and sleep! So when I actually had a day off of training and no errands to run after work the other day, I told Ryan that he could find me in the kitchen for the next 4 hours! I was so happy, cooking, taking pictures, blogging (and maybe drinking a martini or two). Ryan snapped this pic when I turned to get my camera!


Kettler Cuisine


Back in the Kitchen


I had several things on the docket for the evening cooking event:
  • Cherry Chocolate Brownies - to be posted later
  • Mango Black Bean Salsa for my weekend girls beach trip
  • Roasted Red Pepper dip - to be posted later
  • And dinner - a new Kettler creation - Curry Broccoli and Couscous

Curry Broccoli and Couscous

I believe I have mentioned this before, but Ryan and I LOVE Indian cuisine. We have our dear friends Dhruv and Karishma to thank for this. We kept telling them how we disliked Indian cuisine and one day Dhruv said, "We are going to cook you a traditional Indian meal, then we will see." Karishma made 7 or 8 dishes, and each of them blew us away! Ever since then, we have been hooked. Dining out, making our own curries, shopping at the local Indian market for better spices, yum! 

I started playing around with different types of sauces, spices and Indian flavors based on a cookbook I had bought. I am certainly no expert yet, but at least my dishes can keep the Hubby happy :)

So after a lot of basic American cooking this past month, I decided to change it up and try a new curry recipe starring Ryan's fav - broccoli. (And you know me, anytime I can get him to eat more veggies, I am happy)!

Curry Broccoli and Couscous

I started by chopping up all the vegetables, then played around with the sauce flavors. After about 3 attempts at the sauce, I finally was happy with the results. I then made the couscous, steamed the broccoli, sauteed the veggies and mixed everything together.

Curry Broccoli and Couscous

Serves: 4
Prep Time: 15 minutes
Cook Time: 20 minutes

2 small broccoli heads, chopped into bite size florets
3 carrots, shredded (about 1 cup)
8 mushrooms of choice, sliced (about 1 1/2 cups)
1 small red onion, chopped (full 1 cup)
2 T ghee or butter
salt and pepper

1 1/4 cup vegetable broth
1 cup plain dried couscous
salt

2 tsp white balsamic vinegar
4 T olive oil
1 tsp agave or honey
1 tsp curry paste (we used red)
3 tsp curry powder
1/4 cup low fat milk

Optional - golden raisins for garnish

Start by chopping and shredding all the vegetables (broccoli, carrots, mushrooms and onion). Feel free to add in other vegetables of choice as well. I like to chop and cut all the ingredients first before cooking, so I am ready for steps when needed.

Steam the broccoli florets. I like to use a microwave steamer for ease, but anyway you can steam them is fine. Set aside.

Curry Broccoli and Couscous

In a small bowl, combine the vinegar, olive oil, agave/honey, curry paste, curry powder and milk together. Whisk well until all the ingredients are well incorporated. Set the curry sauce aside.

In a small saucepan, bring the vegetable broth to a boil, then add the couscous and a pinch of salt. Quickly stir this, remove from the heat and cover the saucepan. The couscous will be done in about 5 minutes, at which point you can fluff the couscous.

Once the couscous is cooking, start sauteing the vegetables. In a large saute pan, melt the ghee or butter and add the onions. Saute the onions for about 2-3 minutes and add in the shredded carrots. 

Curry Broccoli and Couscous

Cook this for another 2-3 minutes and add the mushrooms (and any other raw vegetables except the steamed broccoli). Let this saute for about 5 minutes until cooked down. Add in the broccoli and curry sauce and lower the heat to medium-low. Stir to combine all the ingredients and cook on low for about 5 minutes to incorporate the flavors. 

Curry Broccoli and Couscous

To serve, either add in the couscous to the vegetable mixture or serve the vegetable mixture over the couscous. Either way, it is delicious with some Naan and mango chutney! Ryan likes to add some heat, so he has a hot garlic chutney that Dhruv had recommended.

*Note, if you like more sauce, just double the recipe, except for the vegetables.

*Note, this can easily be served over quinoa or other gluten-free grain for specific dietary needs. I put the leftovers over lettuce and it was a fantastic salad for lunch!

Wednesday, August 1, 2012

Stewed Butter Beans

Beans usually are not the most desired vegetable among the younger generation, but butter beans are called butter beans for a reason. When they are cooked, they taste like butter!

Stewed Butter Beans | www.kettlercuisine.com

Also known as lima beans, these are another one of my favorite summer vegetables that are abundant at our local Farmer's Market. I hate to be picky again, but the only way I will eat them is if I can find them fresh. Dried beans are too much effort and canned beans are for salsas!

About a year ago, I had the opportunity to do a cooking class at one of the best restaurants in Durham - Nana's. The recipe that I enjoyed learning most was one that highlighted butter beans. I couldn't wait to get home and try my own version. Unfortunately, butter beans were not in season when I got around to trying the recipe, so I had to wait until this summer to try it again. The biggest challenge was to document amounts, as the chef at Nana's did not have any sort of measuring utensil in his kitchen.

There are several elements that make this recipe delicious - bouquet garni, broth and mirepoix. Ok, I promise I am still speaking English...well sort of!

Bouquet Garni

Bouquet garni is a french term for "garnished bouquet," in other terms a bouquet of herbs. This is used to flavor sauces, soups and stews and is very easy to put together. Take string and tie it around a bunch of fresh herbs - any kinds available.

Stewed Butter Beans | www.kettlercuisine.com

Mirepoix

We all know what broth is, but you might be asking what mirepoix is. Another term I learned at the cooking class, that is also referred to the "Holy Trinity" or "Soffritto." Mirepoix is a combination of equal parts celery, onion and carrot. This is the base of most soups, sauces and broths. These three boring vegetables come together to create a fantastic flavor base for many recipes. For all the soups and sauces that I make, I always start with mirepoix now.

Stewed Butter Beans | www.kettlercuisine.com
Mirepoix - equal parts chopped carrots, celery and onion.

Butter Beans

Yields: 4 cups

1 tablespoon butter
1 tablespoon olive oil
1 cup carrots, chopped
1 cup celery, chopped
1 cup onion, chopped
2 cloves garlic, finely chopped
1 bouquet garni (I used basil, thyme, oregano and bay leaves)
   mixture of fresh herbs (can use a combination of basil, chives, oregano, parsley, bay  
   leaves, thyme, rosemary, sage)
   butcher's string
4 cups chicken broth (use vegetable broth for vegetarian version)
1 quart fresh shelled butter beans
1 teaspoon salt
1/2 teaspoon pepper

In a large sauce pot, heat the butter and oil over medium-high heat. Toss in the chopped onion, celery and carrot and stir to coat with the butter/oil mixture. Cook this for about 5-7 minutes just until the vegetables start to become soft.

Stewed Butter Beans | www.kettlercuisine.com

Prepare your bouquet garni while the vegetables are cooking. Tie the butcher's string around a bunch of fresh herbs.

Add the garlic to the pot and cook for another 2 minutes.

Add the broth, bouquet garni and butter beans to the pot. Gently stir to combine and add salt and pepper. Bring the mixture to a boil, lower the heat to a simmer and cover the pot. Cook on low, covered for 45 minutes. Check the beans, stir and continue to cook for an additional 15-20 minutes if they are not done. Be careful not to overcook the beans as they will lose flavor and become too mushy. Once you are able to easily mash the beans with a fork, they are done.

Stewed Butter Beans | www.kettlercuisine.comStewed Butter Beans | www.kettlercuisine.com

I like to serve my beans on top of a baked sweet potato or fresh spinach. You can leave the beans in the broth for more of a soup or drain some of the broth out. I like to reserve the broth to drink or use for other uses like cooking rice, couscous or noodles.