Tuesday, May 28, 2013

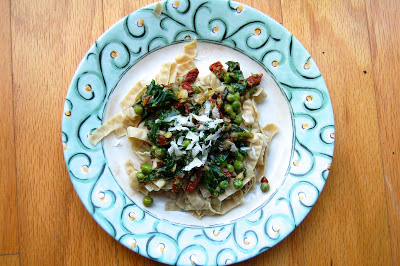
Spring Pea Pesto Pasta

Usually Memorial Day weekend prepares me for the arrival of hot summer weather! However, this year, it was a beautifully perfect weekend, weather-wise (instead of the usual humid heat). I couldn't have ordered up a more perfect day....OR THREE PERFECT DAYS!! Since I am not quite ready for summer yet, my spring vegetable recipe collection shall continue. On the menu today is an easy way to sneak in your veggies over pasta. Trust me, not only did I get the husband approval, but I got the brother approval as well on this one! 

Spring Pea Pesto Pasta | www.kettlercuisine.com

The dish came together after seeing a spring vegetable pasta dish in Cooking Light. I didn't really follow the recipe at all, but it gave me the idea to build something around spring peas, especially since I had a large bag with no clue what to do with them. Fresh peas are pretty abundant among NC spring produce selections. So as usual, I bought a bag with the intention of figuring out what to do with it later.

This dish is a great example of satisfying all palettes. I topped the veggies over mung bean pasta (my new favorite gluten free pasta), Ryan topped his over regular spaghetti noodles and my brother, Bryan, mixed his with Alfredo sauce and then threw over mung bean pasta. Three meals in one, and the best part, I only made one of them!


Spring Pea Pesto Pasta | www.kettlercuisine.com

I will say that to make this a quick and easy recipe, it is helpful to have prepared or store bought pesto. One final jar was in my freezer from last year's stash (provided by my dear friend, Thomas).

Ryan threw on the pasta to cook, while I chopped all the veggies (we make a nice little team in the kitchen). My brother came over just in time to help me prep a cocktail (spoiler alert* for June below) and set the table. 


Spring Pea Pesto Pasta | www.kettlercuisine.com

After our feast, we lazily rolled over to the sofa and rubbed our full bellies! It was a wonderful family affair!

(*Cocktail month is coming in June on Kettler Cuisine!)

Spring Pea Pesto Pasta

Yields: 4-6 servings

4 T butter
5 cloves garlic, minced
1 container fresh baby spinach, chopped
1/2 cup dry packed sun dried tomatoes, chopped
1 container mushrooms (we like shitake)
1 cup fresh peas, (can also use thawed frozen peas)
1/4 cup pesto
**1/2 cup reserved pasta water
1/3 cup grated Parmesan
salt and pepper
Favorite pasta (regular or gluten free)

Cook pasta according to package instructions. Reserve some pasta water before draining (be sure to reserve the gluten free pasta water if serving 2 different types of pasta). 

In a medium bowl, whisk the pesto and 2 tablespoons of pasta water.

Heat a large saute pan over medium-high heat and melt butter. Add the garlic and cook for about 30 seconds. Quickly add in the mushrooms and peas, cook for 2 minutes. Stir in the sun dried tomatoes. After the mushrooms are cooked through, stir in the spinach until wilted. Remove the pan from heat and stir in the pesto mixture, Parmesan cheese, salt and pepper. If the mixture is too thick, add in more of the reserved pasta water, one tablespoon at a time.

Serve over your favorite pasta with more Parmesan cheese.

**Note - Be sure to reserve water from the gluten free pasta if making for a gluten free crowd.

Hint of what's to come in June - Cocktail Month!


Thursday, May 23, 2013

Strawberry Almond Tart

Strawberry Season!!!

One of my favorite seasons, next to tomatoes and peaches...and zucchini and cherries and sweet corn. OK, so let's face it, I love all produce when it is in season. 

Strawberry Almond Tart | www.kettlercuisine.com

The first thought I had when I went gluten free was that I wouldn't be able to have Grandma's Strawberry Pie anymore!!! I was so devastated that I started right away working on a gluten free version. Instead of trying to do a gluten free pastry crust, I thought a tart shell using ground almonds would work well and compliment the strawberries. 

The best thing about this pie, is the small amount of sugar when using sweet strawberries. When strawberries are in season (a good season), they are super sweet. I based my crust recipe off a gluten-free almond crust over at Krissy's Creations and it turned out very well. 

Strawberry Almond Tart | www.kettlercuisine.com


Strawberry Tart (Gluten Free)

Adapted from Krissy's Creations
Makes: 8 inch tart
Prep Time: 45 minutes
Cook Time: 25-30 minutes


2 cups blanched almond flour
2 T honey
4 T unsalted butter, melted
1 tsp lemon zest, divided
pinch of salt
8 oz mascarpone (or cream cheese), softened
2 T sugar (optional)
6 cups fresh strawberries, washed, dried and hulled (divided)
1/4 to 1/3 cup sugar (depending on sweetness of berries)
2 T arrowroot powder (or corn starch)
sliced almonds for garnish
whipped cream

Preheat the oven to 350F.

Rinse the strawberries well and lay out to dry completely.

In a medium bowl, mix the almond flour, melted butter, honey, lemon zest and pinch of salt together until well combined. Lightly spray a tart pan with olive oil or rub with butter. Form the almond flour batter into a ball and press into the tart shell to form a crust. Lay a piece of foil over the crust and gently press down. Fill the foil with pie weights (I use dried lima beans). This is called blind baking, which I describe in a previous post.

Bake the crust, covered, for 20 minutes. Remove the foil and bake for another 5-10 minutes, until the crust starts to brown. Remove the crust and let cool to room temperature. Once the crust is cooled, spread the mascarpone along the bottom. If you like a sweeter cheese, mix the softened mascarpone with 2 T sugar.

Hull all the strawberries and line the prepared crust with whole strawberries (cut side down). Just line the bottom of the crust. Take the remaining strawberries and lightly puree in a food processor or blender.

Place the pureed strawberries into a small sauce pan over medium heat. Once the puree starts to boil, slowly add in the sugar and arrowroot powder and stir continuously so the bottom won't burn or turn into gel. After a few minutes, the mixture will start to thicken. Remove from heat and let cool to room temperature.

Pour the strawberry puree over the whole strawberries on the tart shell, stopping just before the top of the sides of the crust. Reserve the remaining puree for other use (this will keep in the refrigerator for up to 2 weeks).

Place the tart into the refrigerator until ready to serve. Best served with sliced almonds and whipped cream.

Strawberry Almond Tart | www.kettlercuisine.com

Sunday, May 19, 2013

Kettler Travel Journal - San Francisco Part 1

We were in San Francisco last week - land of wine, startups, hipsters and amazing beer! Ryan was like a kid in a candy store on the way up to Petaluma and Santa Rosa to visit Lagunitas Brewery and Russian River Brewery. Our gracious hosts for the trip, Jessica and Corey (who are newly engaged) showed us around. Between the four of us, we tasted more than 25 beers! 


Russian River Brewing Co. - sampler of all beers on tap!

More to come on our trip, but had to share these pics!!


Lagunitas Brewing Co. - custom taster!

Happy Travels!!


My happy husband :)

Tuesday, May 14, 2013

Grilling the Perfect Burgers

If there is one thing we know how to do in our family, it is grill! We don't mess around! 

Grilling the Perfect Burgers | www.kettlercuisine.com

We actually have two grills in our backyard, a charcoal and a very nice gas grill. The one that gets used the most is our little Weber, the first grill we ever bought together. That grill has gone through about 4 weather covers, but stays trusty every time we light up the coals. 

Grilling the Perfect Burgers | www.kettlercuisine.com

Ryan and I prefer the charcoal flavor, for most foods. We grill meats, vegetables, breads, fish, even fruits! And since grilling season is among us, we thought we would share our method to grilling burgers. Nothing is more American than a grilled beef burger (or portabello cap for those veg-heads out there). 

The first, and most important ingredient is the beef. Please do yourself a favor and get good quality meat. We prefer the grass-fed, organically grown beef. However there is an argument about the fat percentage. Ryan loves the 80/20, which will produce a better flavor, but also a larger pants size. I prefer something closer to the 90/10, which is a nice compromise for flavor and fat. We usually come somewhere in between, but it mostly depends on where we get the meat and what is available. 

Grilling the Perfect Burgers | www.kettlercuisine.com

The second ingredient is a raw egg, again, organic here. Much like a meatball or meatloaf, it helps bind the meat together so you don't have broken patties falling through the grill grates! 

Third, flavor enhancers. We start with the staples: Worsheshire, minced onion, salt and pepper. Then occasionally we get crazy: roasted jalapeno, cheese or sun-dried tomatoes.

Grilling the Perfect Burgers | www.kettlercuisine.com

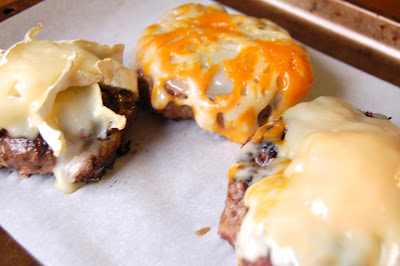
And finally, the toppings. Most importantly, cheese! We go for bold, full flavor and melty, creamy awesomeness, not over-processed, sliced American cheese. We also like to mix cheeses, as seen in these photos.

So go light up the grill and invite your neighbors over! 


Perfect Burgers

Makes: 6 patties
Prep Time: 10 minutes
Cook Time: 7-10 minutes (depending on desired temperature)


2 lbs. ground organic, grass-fed beef
1 egg
1 T garlic, minced
2 T red onion, minced
2 T Worsheshire
Salt to taste
Grapeseed oil for brushing patties

Preheat the grill to high heat. We like to preheat the coals in a large mound and then spread out a little once they are ready. We always leave the edge of the grill with low heat in case a patty cooks faster than another.

Try to let the beef sit out for about 20-30 minutes before handling. Combine the beef, egg, garlic, onion and Worsheshire in large bowl and mix until combined (I use my hands). Form the beef into 6 even sized balls and press down in the middle to form a patty. I like to form a little divot in the center, this helps them cook more evenly.

Grilling the Perfect Burgers | www.kettlercuisine.com

Season the patties with salt on both sides and let sit until the grill is ready. Lightly brush the patties with grapeseed oil, on both sides and grab a timer, spatula and your cheese slices!

Once the coals are ready, spread them out and make sure to brush the grill grate. Place the burgers on the grill and cook for 2 minutes without touching (DO NOT FLATTEN THE BURGERS WITH A SPATULA - absolute no no). Turn the burgers a quarter turn and cook an additional 2 minutes. Flip the burgers and cook for 2 minutes, then quarter turn and cook for 1 minute. Place the cheese slices on top and cover the grill for another minute. Remove the burgers and let them rest for 10 minutes.

Throw the buns on the grill for about 30 seconds to warm before serving.

Grilling the Perfect Burgers | www.kettlercuisine.com

Friday, May 10, 2013

Broccoli Salad

Ryan and I made a deal a long time ago....that I would cook anything he requested. However, there was nothing mentioned about tweaking recipes to make them healthy (sneaky wife)! Through the years, Ryan has learned to cope with this and now actually enjoys healthy eating and cooking. So when my sweet husband requests one of his favorites, broccoli salad, I couldn't say no. Although I did turn up my nose thinking the only way to make it is with a ton of mayonnaise, and we all know that creamy sauces and salads are NOT my favorite. According to one of my favorite bloggers Smitten Kitchen, broccoli salad doesn't have to be that bad for you! Unbeknownst to me, she has a cookbook too!

Broccoli Salad | www.kettlercuisine.com

I was such a happy girl when I got my latest order of cookbooks in the mail (Hi, I'm Jessica and I am addicted to cookbooks). My newest additions to the collection:
I am hitting myself for waiting so long to get Smitten Kitchen, especially since I turn to her site for recipe ideas all the time. She has a great way of telling stories behind a dish and delivering a fool-proof recipe.

Smitten Kitchen Cookbook

As for the cookbook, Smitten Kitchen, GET IT! This is a beautifully written and photographed book with fantastic recipes. I have tried several of her dishes to date and enjoyed them all.

Broccoli Salad | www.kettlercuisine.com

Broccoli Salad

Adapted from Smitten Kitchen: Broccoli Slaw
Makes: 6 cups

Prep Time: 20 minutes

2 heads of fresh broccoli, chopped
1/2 cup thinly sliced almonds
1/3 cup raisins or dried currants
1/4 cup red onion, finely diced and soaked in water for 15 minutes
1/2 cup buttermilk
1/4 cup mayonnaise (I use lite mayo)
2 T cider vinegar
1 T sugar
salt and pepper, to taste

In a small bowl, whisk the buttermilk, mayonnaise, vinegar and sugar until well combined and set aside. For quick prep, chop the broccoli in the food processor with a few pulses. Or simply hand chop the broccoli with a knife - add into a large bowl. Stir in the almonds, raisins and onions. Pour the dressing over the broccoli salad and stir until well combined. Season with salt and pepper and store in the refrigerator until ready to serve. This salad will keep for up to a week in the refrigerator.

Broccoli Salad | www.kettlercuisine.com

Friday, May 3, 2013

Jalapeño Vodka and Roasted Guacamole for Cinco de Mayo

It must be a trend for Ryan and I to always travel on Cinco de Mayo. If you recall, we spent much of last year's Cinco de Mayo holiday stuck in Detroit, but that didn't stop us from celebrating with a little Mexican flare.

Jalapeño Vodka and Roasted Guacamole for Cinco de Mayo

This year, we planned ahead. Knowing that we were flying to the Midwest again to visit family, we decided to prepare a little Cinco de Mayo treat for our followers! It started with just a simple guacamole recipe, then turned into a full on fiesta, including a refreshing cocktail (with a little flare)!

Jalapeño Vodka and Roasted Guacamole for Cinco de Mayo

Despite the focus of this blog (compromising in the kitchen), Ryan and I always agree on avocados, especially when it comes to guacamole. We make it a lot as a pre-dinner snack or to eat alongside our meals. Simple smashed avocados are fantastic on any toast or bread. Then, when you add a few spices or a bit of salsa, smashed avocados turn into one amazing snack!

Jalapeño Vodka and Roasted Guacamole for Cinco de Mayo

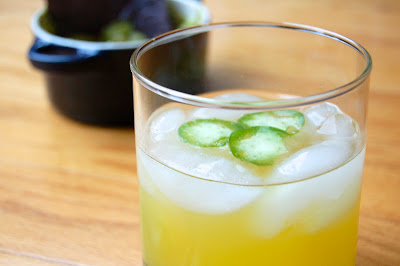
I started infusing vodkas several months ago to add some variety to our liquor cabinet. There are not a lot of liquors and mixers that I can drink, so by adding flavor to the actual liquor, I get more of a variety. Ryan kept asking me to make jalapeño vodka. This did not sound appetizing to me until I tried a new drink at our favorite taco restaurant that included jalapeño-infused vodka. It was spicy, yet refreshing at the same time.

We purchased a small bottle of Tito's vodka and took a shot! Not literally, but figuratively, by infusing the vodka with jalapeños. It was the perfect sidekick for our little pre-Cinco de Mayo fiesta. Enjoy!

Jalapeño Vodka and Roasted Guacamole for Cinco de Mayo

Jalapeño Vodka

Makes: mL of vodka
Prep Time: 2 minutes + 3 days

250 mL Tito's Vodka
2 jalapeños, thinly sliced (with seeds)

Pour the vodka into an air tight jar and add the jalapeño slices. Seal and store away in a dark cool place for 2-5 days. Shake the jar a few times a day.

After a few days, pour the mixture through a strainer or coffee filter to remove the jalapeño slices and seeds.

Suggestion for serving:
1 part Jalapeño Vodka
2 parts pineapple juice
Mix well and serve over ice!

Jalapeño Vodka and Roasted Guacamole for Cinco de Mayo


Roasted Guacamole

Makes: 3 cups
Prep Time: 10 minutes
Cook Time: 20 minutes

jalapeños
4-6 tomatillos, husks removed
2 avocados, mashed

1/2 lime, juiced
2 tsp red onion, minced
1/4 tsp garlic powder
1/4 tsp salt
1/4 pepper

Preheat the oven to 400F. Line a baking sheet with foil and roast the jalapeños and tomatillos for 20 minutes, removing the tomatillos after 15 minutes. Turn the jalapeños halfway.

In a medium bowl, mash the avocados and stir in the lime juice, red onion, salt, garlic powder and pepper.

Chop the roasted jalapeño and tomatillos once cooled and stir into the guacamole. Garnish with chopped cilantro and let sit in the refrigerator for 20-30 minutes before serving.

Jalapeño Vodka and Roasted Guacamole for Cinco de Mayo