Sunday, December 29, 2013

Beef Jerky and Broken Foot

Well just when I thought my life couldn't get any crazier or inconvenient, this happened...


Yep, I broke my foot. Awesome, I know, but maybe it is a sign that I needed to slow down because you want to know how I broke it? I was rushing through errands and late to meet someone, I caught a curb the wrong way and rolled my foot right off it. Bam, broken fifth metatarsal and pulled small tendon on my driving foot. Hubby is being very attentive which is great but I am not good at being waited on all the time.

Beef Jerky

Needless to say, there won't be much speedy or creative cooking in my kitchen for a while, at least until I get off the crutches. So for now, I will focus on slow. Because that is what I am right now, slow! 

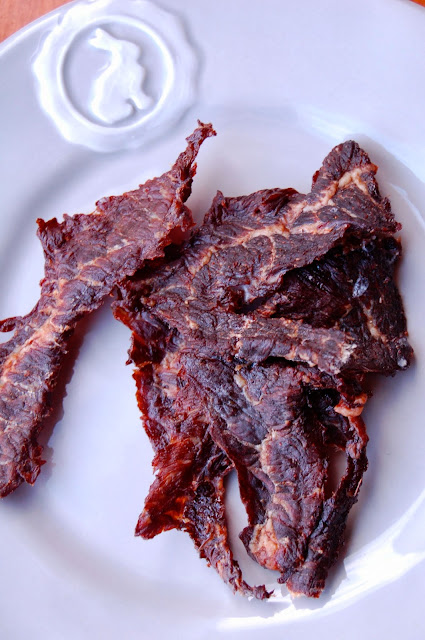
Beef jerky 

This might be the perfect time to post my beef jerky recipe. Well, it's actually a family friends recipe that I have loved for years and years. My brother and I use to devour a bag of this jerky every time we went to visit our friends at the lake. When I got married, Sandy (family friend) not only gave me a new dehydrator, but the famous recipe as well! I have been wanting to get this on the blog for a while, and figured since I am gimping around and not able to go out much, I had the time to make the jerky for the Holidays and share it. Sandy, hope you don't mind :)

Beef Jerky

Beef Jerky

Prep Time: 15 minutes
Cook Time: 5-6 hours (depending on dehydrator)

2 pounds flank steak, trimmed of excess fat
1 cup white wine
2 tablespoons cajun seasoning
2 tablespoons Worcestershire sauce
1/2 cup tamari (or soy sauce)
1/4 teaspoon cayenne pepper
1/4 teaspoon chili powder
2 tablespoons liquid smoke

Start by trimming the excess fat off the cut of meat. Pat dry and freeze for 2 hours, which will make the beef easier to slice.

Add the remaining ingredients into a small bowl and whisk until well combined. With a sharp knife, slicing against the grain, slice even-size thin pieces. Add the meat slices into a large plastic bag along with the marinade and massage around. Refrigerate overnight up to 24 hours, turning the bag a few times while marinading. 

Setup a dehydrator and remove the meat slices from the bag and place on the trays. Cook according to the dehydrator instructions - mine is 71C for about 5-6 hours.

Move and cool before placing in an air tight container. Keep the jerky in a cool dark place for up to a week or refrigerate for up to a month.

Wednesday, December 25, 2013

Happy Holidays from Kettler Cuisine

Kettler Cuisine wishes you and your loved ones a Happy Holiday Season! Hope it is full of love, joy and yummy dishes!


Merry Christmas

Thursday, December 19, 2013

Tortellini and Spinach Soup

Work has been crazy. Seriously crazy. I am putting in a lot of time there, so cooking dinner has gone down on the priority list lately (which kills me to say). There is really only so much take-out a girl can take! I was determined to come up with a list of easy dinners that I or the Hubby could throw together and initially thought of one that I had growing up - Tortellini Soup.

Tortellini and Spinach Soup

My brother and I were a handful growing up. I have mad props for my mom being able to juggle work, volunteer stuff, school stuff, kids, husband, house, life AND cooking! She always had dinner on the table and it was always delicious.

One of her staple winter meals was this Tortellini Soup recipe. You need to add this to your recipe repertoire immediately because it takes 10 minutes to throw together, can feed an army (of hungry kids or husbands) and, some how, finds a way to taste even better after a few days in the fridge!

Tortellini and Spinach Soup

Hubby LOVES this soup, and always makes me double up on the bacon and tortellini. Sometimes I will make two pots, one with double bacon and tortellini for him, and one with double spinach for me!


Tortellini Soup


Altered from my Mom's recipe
Yields: 6-8 servings
Prep Time: 5 minutes
Cook Time: 10 minutes


4 cloves of garlic, minced
8 slices of bacon, thinly sliced (leave out if vegetarian)
One 15 ounce can of cannellini beans, drained and rinsed
One 28 ounce can diced tomatoes
8 cups chicken broth (or vegetable broth)
Parmesan rind (optional)
Two 9 ounce packages cheese tortellini (or spinach tortellini)
4 cups fresh spinach, chopped

In a large soup pot over medium heat, render the bacon slices until almost crispy. Add in the garlic and saute for a little under a minute, stirring constantly. Stir in the tomatoes and beans, then finally the chicken broth and Parmesan rind.

Bring this to a simmer and stir in the tortellini. Cook this according to the package and stir in the fresh spinach in the last minute of cooking until wilted.

How I make this gluten free:
 - before adding the tortellini, I remove some of the soup. I add in cooked brown rice and Parmesan cheese to mine.

Tortellini and Spinach Soup

Wednesday, December 11, 2013

Betty's Date Pinwheels - Food Blogger Cookie Swap

Cookies, cookies, cookies everywhere! Yes, it's that time of year again! Time for the Great Food Bloggers Cookie Swap!

Betty's Date Pinwheels - Food Blogger Cookie Swap

I discovered this massive cookie swap last year and made my Cherry Walnut Oatmeal Cookies for three lucky bloggers across the US :) Since last year, I have really improved my baking skills to include pies, cakes, muffins and of course cookies. I was on a roll the other weekend, baking up a storm of Christmas cookies. My kitchen was covered in powdered sugar and softened butter. 


It is amazing how popular you become in your office when you bring in treats every Monday. Not to mention the Hubby is loving all these cookies that magically arrive on our doorstep. We first received some Brownie Drops from Satisfy My Sweet Tooth. I had to hide them so Hubby and his buddies wouldn't devour them before I could get pics for this post!

 Betty's Date Pinwheels - Food Blogger Cookie Swap        Betty's Date Pinwheels - Food Blogger Cookie Swap

We then received some delicious Cinnamon Pecan Tea Cakes from Being the Secret Ingredient. These were moist, flavorful bites that were perfect with my morning cup of coffee (yes, I had some for breakfast)!

Betty's Date Pinwheels - Food Blogger Cookie Swap

As for my contribution to the Cookie Swap, I went back in time. I have written about my grandmother in several posts and what an amazing cook she was. She especially had a knack for baking and didn't even write down recipes, just made things from memory and sensory. A favorite in my family are the Date Pinwheels, which basically mixes a sugar cookie with a shortbread cookie and fills it with a fruity, nutty paste. I had to track down the recipe from my Aunt Liz so I could test it for the swap. TEST RUN APPROVED!!

These cookies do involve a few extra steps, but they are totally worth it, especially if you are a date fan. Eating them just made me miss her even more! I hope that all the recipients of my cookies enjoyed them (I know at least one of them did since she sent me a note the day she got them). These cookies are very special to me, so be sure to include lots of love when you make them.

Betty's Date Pinwheels - Food Blogger Cookie Swap


Betty's Date Pinwheels


Yields: 25-30 cookies
Prep Time: 30 minutes
Cook Time: 10-12 minutes


7 oz (200g) pitted dates, chopped
1/3 cup water
1 cup walnuts, chopped

3/4 cup granulated sugar, divided
1/2 cup unsalted butter, room temperature
1/2 cup light brown sugar
1/2 teaspoon vanilla extract
1 egg
2 cups all-purpose flour, sifted
pinch salt
1/2 teaspoon baking soda

In a small saucepan, bring the dates, water and 1/4 cup of the sugar to a simmer and cook, while stirring for 2-3 minutes until thickened. Set this aside and cool.

In a standing mixer, cream the butter, brown sugar and rest of granulated sugar until light in color. Stir in the egg, vanilla, salt and sifted flour and baking soda. Mix until all the ingredients are combined. 

Split the dough in half and roll each dough ball out until it is about 1/4 of an inch thick. Spread some of the prepared date paste and gently roll the the dough to create a log. Wrap each log in plastic wrap and chill overnight. 

Preheat the oven to 375F and line cookie sheets with parchment paper or a Silpat baking mat. Unwrap the dough logs and slice into 1/4 inch thick cookies. Bake for 10-12 minutes until slightly golden. Remove from the oven and cool on a wire rack until room temperature.